
Is it possible to change the seal on a Miele washing machine at home? Definitely yes. This repair is not considered difficult. Some experts recommend replacing the seal without dismantling the front wall of the case, others - with the removal of the front panel, the "dashboard" and the top cover. Let's look at the upcoming work step by step.
You need to prepare for any repair. First of all, look through the instructions for the Miele washing machine. It describes the device of the washing machine - this will not hurt a novice master.
The next stage is the purchase of new components. To ensure the cuff fits properly, check the model name of your Miele SMA . Then the salesperson in the store will be able to select a similar seal. You can order an elastic band on the Internet, but there is a risk of making a mistake with the sizes.
You can first do the dismantling, pull out the old seal and go to the store with it. Then it will be easier for the seller to select an analogue. There is a marking on the cuff - so it will be impossible to make a mistake with the sizes.
It is better to immediately prepare the tools that may be required for the job. The list is small. To replace the cuff, all you need to have on hand is:
Now you should take care of the machine itself. First, turn off the power to the equipment by unplugging the power cord from the outlet. Next, close the shut-off valve on the water pipe, unhook the drain and inlet hoses from the body. Then you need to move the washing machine to the place where the repair will take place.
This completes the preparation. Now you can start repairing. It is better to change the hatch cuff by removing the front wall of the case, the instrument panel and the top cover. Therefore, we begin to partially disassemble the washing machine.
To easily remove the rubber seal, you will need to partially disassemble the washer body. First of all, the top panel is removed. For this:
Next, you need to remove the powder receptacle from the machine. Pull the tray all the way and press the plastic tab in the center of the cuvette. After removing the detergent dispenser, you can begin dismantling the dashboard.
The control panel is held in place by several screws. Some of the screws were hidden by the top cover, two by the powder receptacle. Now all the bolts can be unscrewed with a regular Phillips screwdriver.
Next, you need to remove the automatic machine's dashboard. It is now held in place by only a few latches. You can press the fasteners with a screwdriver. Press the locking elements one by one and carefully unhook the "dashboard" from the body.
Behind the control panel there will be a bundle of wires connecting it to the electronic module. There is no need to unhook them. Just carefully place the appliance on top, on the corner of the washing machine.
Then you need to work with the lower part of the SMA body. Take a slotted screwdriver and hook the service hatch door covering the garbage filter. The element is located on the decorative panel.
After opening the hatch door, carefully move the emergency drain pipe aside - the hose may interfere with further dismantling. Using a Phillips screwdriver, remove the bolt securing the false panel. The self-tapping screw is located either to the right or to the left of the drain filter - its location depends on the Miele SMA model.
Next, you will need to unfasten the decorative panel. It is held in place by several latches. Carefully grasp the element and pull it off the latches first on the right, then on the left.
Then you need to remove the front sealing collar. It is necessary to remove it right now, as it will interfere with the dismantling of the front wall of the case. How to proceed:
After removing the clamp, tuck the sealing rubber into the drum so that its edges do not cling to the front wall of the housing. Otherwise, it will interfere with the removal of the front panel of the MCA. Then work with the lock-lock - unscrew the two screws holding the locking device. The bolts are located to the right of the hatch and can be removed with a regular Phillips screwdriver.
Now, only a few screws prevent the removal of the front panel of the Miele automatic machine. Unscrew the screws and carefully push the UBL out of the panel so that the lock falls inside. Then you can remove the front part of the SMA housing.
There is no need to disconnect the hatch door - it is better to leave it assembled with the front wall. After that, all that remains is to unhook the hose connected to the cuff nipple. This completes the main part of the disassembly.
Now is the time to remove the old rubber seal and install a new one. The drum cuff is fixed with an external and internal clamp. The front ring has already been removed - all that remains is to dismantle the previously hidden element.
Dealing with the inner clamp is quite simple. Removing the front wall opened access to the ring. It is also necessary to hook the spring with a screwdriver and pull out the rim.
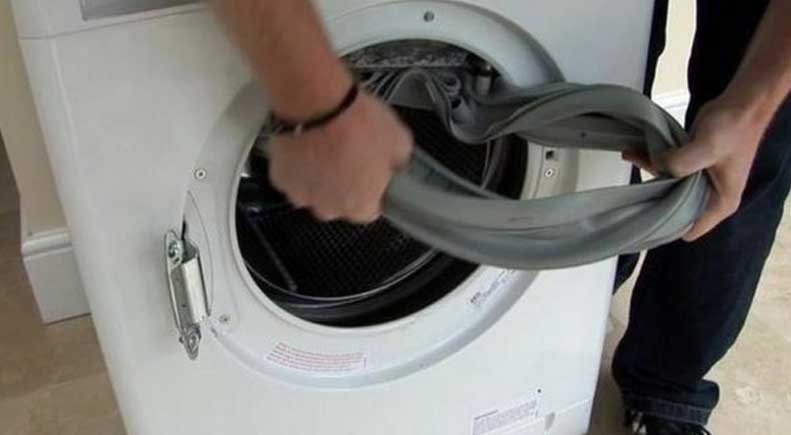
The next step is to remove the cuff itself. Grasp the seal with both hands and pull it out of its seat with force. Don't be afraid to damage the rubber, it will be thrown away anyway.
Be prepared for a large amount of dirt to be found under the cuff. Clean the seat from accumulated debris. Next, remove the bushing from the old seal and install it on the new part.
Then the new cuff is turned over with the nipple facing up. It is important to install the seal correctly. The arrow on the gasket should match the mark on the washing machine body, and the technological recesses should be at the bottom.
Having figured out the location of the seal, pull it onto the seat. Then the cuff is fixed with an external clamp. You can buy a new rim or install the old one.
Fixing the cuff with clamps is the most difficult part of the repair. “Spare hands” may be required here, so it is better to call an assistant. Stretch the spring a little and put the rim in place. To make installation easier, use two slotted screwdrivers.
You need to be careful with the new cuff. Sometimes, when tightening the clamps, the seal is pierced with screwdrivers. In this case, you will have to run to the store for a new gasket, so be careful.
After installing the internal clamp, we can talk about reaching the “finish line”. Further steps are performed in reverse order:
Replacing the cuff is not as difficult as it may seem. Even a beginner can handle this type of work, especially since no special tools are required. The main thing is to follow the instructions and observe safety precautions.


Copyright © 2020 Coimbatore Service.