
Sometimes during repairs it becomes necessary to halve the drum of the Candy washing machine. This is usually required when the bearings and seal hidden inside the structure are damaged. Washing machines of the Italian brand are equipped with non-separable tanks, which significantly complicates the work.
Is it possible to halve a non-separable drum with your own hands? What tools will be needed in the process? How then to assemble the structure so that it remains airtight? Let's look into the nuances.
The steps for removing the tank are the same for all Kandy models. The only significant difference will be in working with front-facing and vertical cameras. In the first case, you will have to remove the front panel of the case, in the second - the side wall.
In order to disassemble the washing machine and halve the tank, you will need the following tools:
To comfortably disassemble the washing machine you will need 2-3 sq.. free space. Therefore, place the device in the center of the room to have access to all sides of the cabinet. It is necessary to disconnect from the tank all elements that will interfere with its removal. Algorithm of actions:
Now all parts are disconnected from the tank, and nothing interferes with the removal of the container. You can proceed to weakening the shock-absorbing elements. Unscrew the suspension spring clamps and remove the tank-drum assembly from the housing. The non-removable structure must be laid on a flat surface.
Many automatic machines are equipped with a non-separable drum. This reduces the cost of the washing machine. In cast structures there are no additional bolts and fasteners, which reduces the cost of production.
The bet is also placed on the subsequent sale of components. For example, if the bearings break, many users will not cut the tank, but will buy an assembled structure. This is additional revenue for the manufacturer.
Craftsmen have long come up with a way to divide a non-separable tank and put it back together without losing the integrity of the structure. A plastic container is “sawed” with a hand saw. Generally speaking, the algorithm of actions will be as follows:
mark holes on the side of the tank at intervals of 5-7 cm (they will be needed to reassemble the structure)
In general, the outlined plan is quite simple. However, in reality, the work ahead is exquisite. It will be necessary not only to carefully halve the tank so that there are no difficulties with its assembly later, but also to press out the bearings and put new rings in place. Therefore, we will analyze each stage of work in more detail.
To begin, wipe the tank with a clean damp cloth and mark points around the perimeter of the factory seam. Holes must be made at a distance of 5-7 cm. The drill must have a diameter of 3-5 mm.
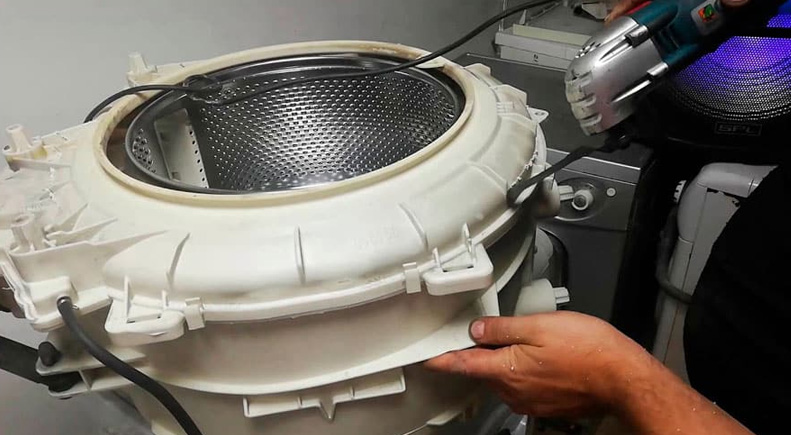
Next, arm yourself with a hacksaw and carefully cut the tank along the seam. The rear part of the structure will contain the drum, bearings and oil seal. Therefore, further work is carried out with this “forecastle”.
Now you need to pull the drum out of the plastic half. To do this, the pulley is unscrewed, and the shaft is knocked out. The next stage is dismantling the broken bearings.
Each bearing is tapped in a circle. Sometimes parts do not give in - then it is recommended to treat them with WD-40 aerosol and leave for 15 minutes. This will make it easier to remove the rings.
When finished pressing, clean the seat from dirt. The drum shaft also needs to be wiped and polished. After this, you can begin installing new bearings.
Rings are always replaced in pairs. A new rubber seal must also be installed. Before installation, the bearings and oil seal are generously treated with special lubricant.
After lubricating the bearing, place it in the seat and press it in with a drift. The element is tapped along the outer edge. When the ring is completely in place and rests against the side, a characteristic dull sound will be heard.
The oil seal is placed on the inner bearing. The sealing rubber must be generously treated with lubricant - it is difficult to overdo it in this matter. Silicone will prevent water from entering the unit, which means it will extend the service life of new spare parts.
Next, you need to secure the drum in the rear forecastle. The pulley is put in place and tightened with a screw. To “glue” two halves of a plastic container you will need a high-quality, moisture-resistant silicone sealant.
Apply sealant around the perimeter of the halves and connect the parts. The drilled points will serve to tighten the two forecastles with screws. Now you can begin reassembling the machine - return the plastic container to its place and connect the wiring of the heating element, motor, and drainpipe to it. Then install the rear and front panels, tidy, garbage filter and other elements.


Copyright © 2020 Coimbatore Service.