
If there are problems with bearings and seals, almost complete disassembly of the Bosch washing machine is necessary. However, the initial easy removal of elements on the approach to the tank is difficult: the assembly is heavy, there are many fasteners, and you must act in the dark. Despite the difficulties, anyone can disassemble a washing machine drum at home. You just need to prepare the tools and act according to a certain scheme. Let us tell you in more detail what, how and why.
The beauty of the Bosch machine is that it is repairable. Moreover, the manufacturer has made disassembling the case as easy as possible, which allows you to cope with the task quickly. All components of the system relate to self-tapping screws, bolts, or clamps, so the work requires a minimum of tools. It is enough to prepare screwdrivers and pliers, but it is better to simplify the task and additionally find:
Having prepared the tools, we proceed to the “paper” work - studying the factory instructions. As a rule, all Bosch models have an identical design, but it is better to eliminate the possibility of error. We pay special attention to the type of engine installed. The inverter motor is connected to the drum directly, while the collector motor involves transmission through a belt and pulley. We also look at the location of the heating element, pump, and pipes.
To begin disassembling the tank, you must first “reach” it. To do this, you will have to sequentially disconnect all the elements of the washing machine from the body. It is not difficult to do this yourself if you do not deviate from the instructions.
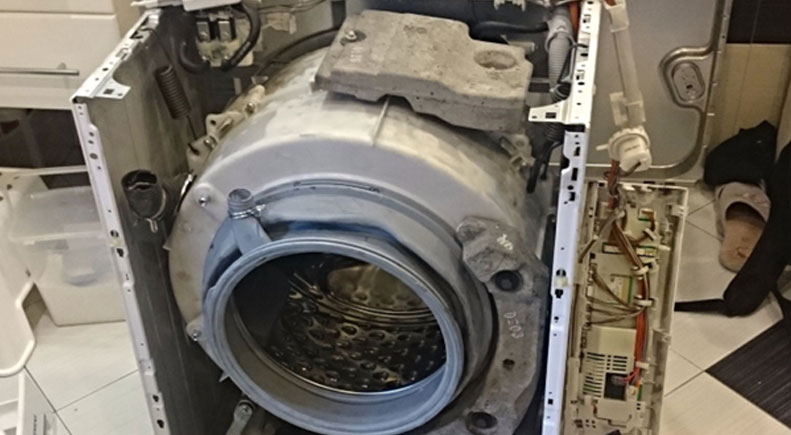
Next in line is the tank, which needs to be freed from all connected wires, elements, and connections. First, disconnect the hoses from the plastic, then remove the engine, dampers, and springs. All that remains is to grab the drum, lift it and remove it from the body. This is not easy to do, so it is better to call someone for help.
Place the removed tank on a dry, flat surface and begin disassembly. To make it easier and simpler, it is better to clean the surface of the tank from soap deposits. Next, put on gloves and follow the following instructions:
Service center technicians often act more treacherously; they do not place plates under the latches, but simply break them. This speeds up disassembly of the tank but weakens its structure. The fact is that without plastic clamps the tank is held only by self-tapping screws. This is acceptable, but still unreliable.
After freeing the drum, you can begin repairing the unit. As a rule, the final stage of such disassembly of a Bosch machine is planned to replace the bearings. In this case, first the oil seal is removed, and the cross is unscrewed, and then both “rings” are knocked out with a chisel and hammer. Next, the seat is thoroughly cleaned with WD-40. Then new elements are installed, and the joint is treated with silicone sealant. The tank is assembled in the same way, only in reverse order.


Copyright © 2020 Coimbatore Service.